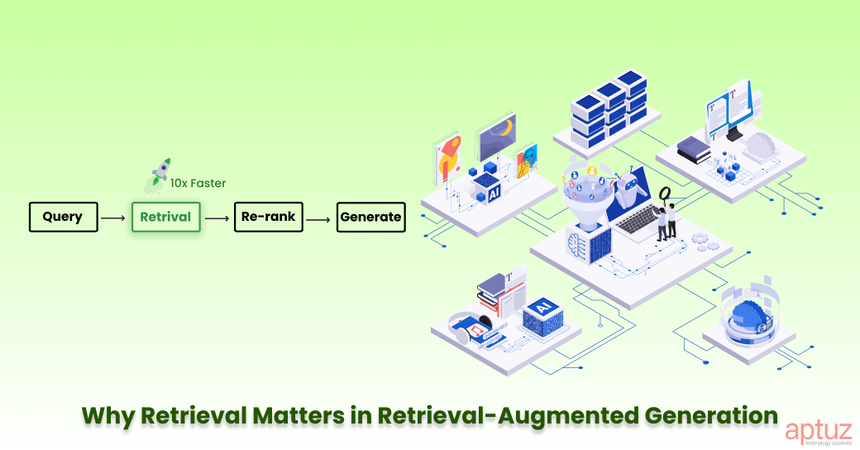
When I first started building RAG (Retrieval-Augmented Generation) systems, I thought the biggest problem would be the language model. But I was wrong. The real bottleneck is retrieval. If your pipeline brings back the wrong chunks, even GPT-5 can’t save you.
Over time, I’ve broken down the optimization process into a few clear steps. In this blog, I’ll share what worked for me, the mistakes I made, and the practical tricks that helped me get my RAG pipelines running smoothly.
Step 1: Fix the Basics (The Hard Way I Learned It)
In the beginning, I just dumped raw Word Docs into my system and split them randomly. The results were messy hallucinations, broken answers, and a lot of frustration.
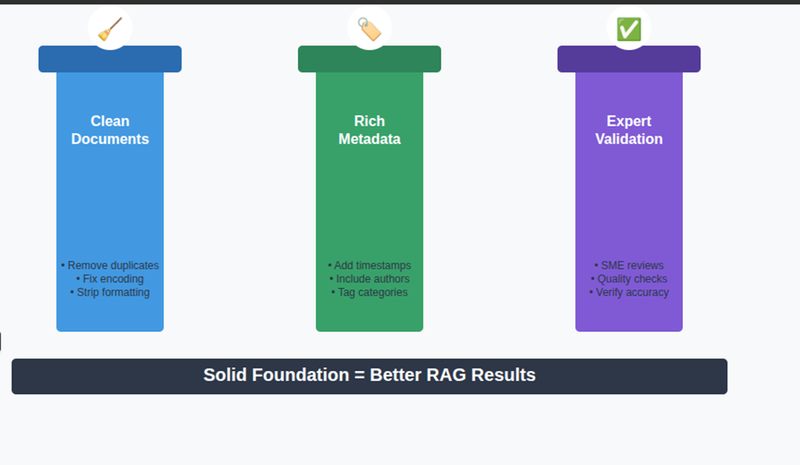
Later I realized: data quality is everything.
- I started cleaning documents and adding metadata like date, section, and author.
- I updated data regularly instead of letting old stuff sit forever.
- I let subject matter experts validate tricky docs before indexing them.
Lesson learned: A bad foundation will always break your pipeline.
Step 2: Smarter Chunking
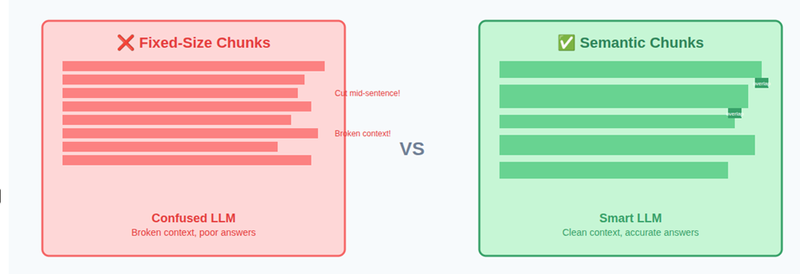
One of my early mistakes in RAG was using fixed-size chunks--for example, 500 tokens per chunk
-The Problem with Fixed-Size Chunking was
Fixed-size chunking doesn’t care about semantics. It only cares about token count.
That leads to problems like:
A definition split in half
- A table broken across chunks
- A sentence cut mid-way, losing its conclusion
When this happens, the retriever may fetch:
- Half a definition
- A table without headers
- Context without the actual answer
The LLM then tries to “fill the gaps” and ends up hallucinating or giving partial answers based on the temperature we set.
Result: Broken context → Confused LLM → Poor answers
What Worked Better: Semantic-Aware Chunking
Instead of slicing text mechanically, I switched to meaning-preserving chunking.
Each chunk should be understandable on its own.
That means:
- Don’t cut in the middle of sentences
- Prefer paragraph or section boundaries
- Keep related ideas together
Here’s the approach that consistently improved retrieval quality:
1.Sentence-level / Paragraph-aware splitting
Split text using natural separators:
- Paragraphs (\n\n)
- New lines (\n)
- Sentences (.)
This keeps definitions, explanations, and tables intact.
2. Dynamic chunk sizes based on use case
Not all questions need the same context size.
- Small chunks (128–256 tokens)
Best for:- Very specific questions
- Fact lookups
- Definitions
- Medium chunks (512 tokens)
Best for:- Most documentation
- API explanations
- How-to guides
- Large chunks (768–1024 tokens)
Best for:- Concept-heavy explanations
- Reasoning across multiple paragraphs
- Design discussions
The key insight:
Chunk size is not a constant. It’s a trade-off between precision and context.
Example:
from langchain.text_splitter import RecursiveCharacterTextSplitter

splitter = RecursiveCharacterTextSplitter(
    chunk_size=500,
    chunk_overlap=50,
    separators=["\n\n", "\n", ".", " "]
)
chunks = splitter.split_text(document)
print(len(chunks), chunks[0])
In the above example
Chunks are created hierarchically based on separators, while respecting the chunk_size limit.
Here’s what actually happens:
- The splitter tries to fit as much text as possible within chunk_size (500 tokens).
- While doing that, it first attempts to split using the highest-level separator:
- Paragraphs (\n\n)
- If a paragraph is too large to fit, it falls back to:
- New lines (\n)
- If that still doesn’t work, it tries:
- Sentence boundaries (.)
- As a last resort, it splits on:
- Spaces ( )
This recursive fallback ensures that:
- Meaningful boundaries are preferred
- Chunks stay semantically coherent
What chunk_overlap Does
chunk_overlap=50 means:
- The last 50 tokens of one chunk are repeated at the beginning of the next chunk
- This prevents loss of important context at chunk boundaries
- Especially useful when:
A key idea spans two chunks
A sentence or explanation flows across boundaries
This one change improved retrieval more than any model tuning I tried before.
Step 3: Metadata Saved My Pipeline
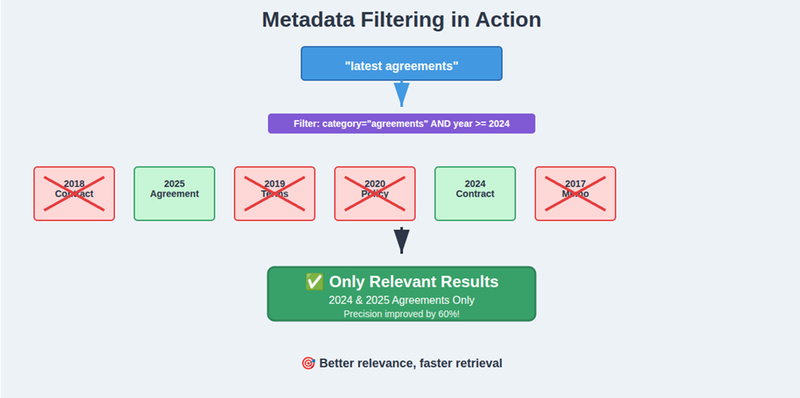
At first, my RAG would return irrelevant sections because everything looked “semantically similar.”
Then I started filtering with metadata — like category, year, or document type. For example, if the user asks about “latest agreements,” I don’t want a 2018 doc. Metadata filtering solved that.
Example:
results = index.query(

    vector=embedding,

    filter={"category": "agreements", "year": 2025},

    top_k=5

)
That small filter improved precision massively.
Step 4: Advanced Retrieval (When Basics Aren’t Enough)
Even with clean data and chunking, some queries were still failing. That’s when I explored more advanced tricks.
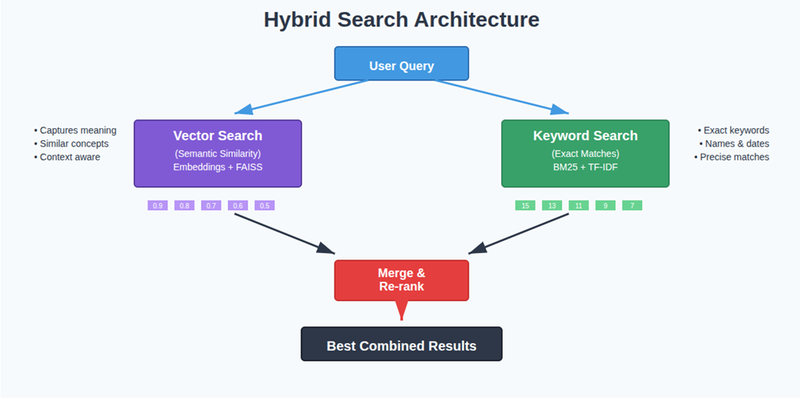
Hybrid Search
At first, I only used vector search. But it missed out on exact keywords like names, dates, and IDs.
Now, I combine vector search + keyword search.
Query Rewriting
Users often ask vague questions. I use the LLM itself to rewrite queries into multiple variations. Sometimes I even generate a hypothetical answer and embed it for better retrieval.
Example:
query = "Impact of rate increase on Bill"

multi_queries = llm.generate_rewrites(query, n=3)
Re-ranking
This was another game-changer. Instead of blindly trusting vector DB results, I pass them through a cross-encoder model that re-scores based on the query.
Example:
from sentence_transformers import CrossEncoder


model = CrossEncoder("BAAI/bge-reranker-v2-m3")

scores = model.predict([(query, doc) for doc in retrieved_docs])

ranked = [doc for _, doc in sorted(zip(scores, retrieved_docs), reverse=True)]
I also used the Amazon Rerank 1.0 model via the AWS SDK to rerank retrieved results instead of hosting the open-source reranker models, making the RAG pipeline more accurate and production-ready.
Suddenly, the top 3 results actually made sense.
Step 5: Making It Fast
Once I got accuracy right, latency is not an issue in my case. But in your case it might be, Nobody likes waiting !.
What can be work for you:
- Using Redis caching for repeated queries.
- Batch embedding instead of one by one.
- Running FAISS with optimized indexes.
Caching trick I used in other project:
import redis, hashlib, json


r = redis.Redis()


def cache_query(query, func):

    key = hashlib.md5(query.encode()).hexdigest()

    if r.exists(key):

        return json.loads(r.get(key))

    result = func(query)

    r.set(key, json.dumps(result))

    return result
This alone reduced response time by ~30% in one of my projects.
Step 6: Don’t Forget Monitoring
At first, I thought once the system works, I’m done. But in production, things change fast.
- Sometimes the model starts hallucinating.
- Sometimes new data breaks chunking.
- Sometimes latency spikes.
So, I started tracking:
- Retrieval precision, recall, hit rate
- Answer relevancy and faithfulness
- Latency per stage
Lesson learned: Monitoring is not optional in RAG.
Final Thoughts
If I had to summarize my experience:
- Start with data, not the LLM. Clean it, chunk it right, and add metadata.
- Mix techniques. Hybrid search + re-ranking beats any single method.
- Speed matters. Use caching and batching.
- Measure everything. Otherwise, you won’t know what’s broken.
When I first built RAG, I wasted weeks tweaking prompts and models. Now I know: the real secret to a good RAG pipeline is retrieval optimization step by step.
And honestly? Once retrieval was fixed, my LLM felt 10x smarter — without me touching its weights.