Whether you're working on a solo project or collaborating with a team, setting up a consistent development environment can be a nightmare different operating systems, package versions, and system configurations often lead to the classic “works on my machine” problem.
That’s where Docker comes to the rescue.
In this hands-on guide, we’ll explore what Docker is, why it matters, and how you can use it to containerize a real-world application backed by Database.
What is Docker?
Docker is a platform designed to help you build, ship, and run applications inside containers — lightweight, portable, and self-sufficient environments that include everything your app needs to run.
With Docker, you no longer need to worry about dependencies or system compatibility. Just write your app, package it, and run it anywhere.
Components of Docker, we should know
- Docker Images:-
A Docker image is like a blueprint for a container. It includes everything needed to run an app:code, runtime, libraries, environment variables and configuration.
All these images live in docker container repositories, It may be public or private repository for Docker.
- Docker Containers:-
Docker container is the instance of the Docker image. It is a way of package an application with all neccessary dependencies & configuration, It is portable, easily share and move around.
Image is an actual package contains configuration, services and scripts to run a container. And these containers live on our local machine, server, or cloud platform.
- Docker Network:-
It is a virtual network that lets your containers communicate with each other and with the outside world. These are like wires that connects containers together within same network and communicates via container names.
To create docker network
docker network create <network_name>
- Docker Volumes :-
Volumes are persistent data stores for containers, created and managed by Docker. we can create a volume explicitly using the docker volume create command, or Docker can create a volume during container or service creation.To create a docker volume
docker volume create <volume_name>
Normally, when you run a container, all its data lives inside the container. If the container dies, the data dies too. They are storage outside the container filesystem, managed by Docker.
- They live on the host machine.
- You can share them between containers.
- They survive container recreation, restart, and deletion.
As we discussed earlier all public docker images are stored in docker hub.(https://hub.docker.com)
Whereas private repositories stored GitHub Container Registry, Amazon ECR, Azure Container Registry (ACR) etc..
Creating a Container with docker Public image
Lets dive practically to create a container using docker image. Will create a container from nginix image.
- Pull nginx image from https://hub.docker.com.
docker pull nginx
- create a container using pulled nginx image.generally nginx listens on port 80 map it to your available port.
docker run -d --name my-nginx-app -p 8080:80 nginx:latest
- Navigate to https://localhost:8080, You should see the default Nginx welcome page.
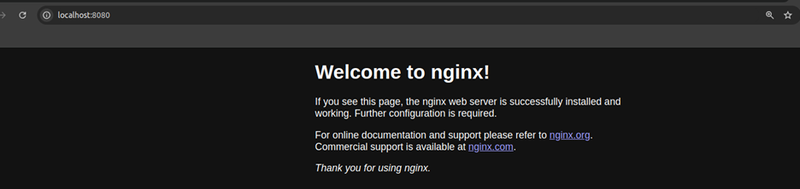
Awesome! We’ve successfully launched our first Docker container—smooth and easy!
Creating our own docker Image
Now lets create our own docker image by using fastapi technology. We are going to create an application which can take response from user and stores it in database (MongoDb). We’ll see all those things later, but now follow with me to create our python code as an docker image and push it to our private repository (aws ECR) . Create a repository as follows:
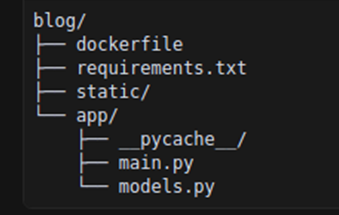
Here are the code snippets you can try:
app/main.py
from fastapi import FastAPI

from fastapi.responses import FileResponse

from fastapi.staticfiles import StaticFiles

from app.models import Feedback

from pymongo import MongoClient

import os


# Initialize FastAPI app

app = FastAPI()


# MongoDB connection string from environment variable or fallback default

MONGO_URL = os.environ.get("MONGO_URL", "mongodb://admin:vijay_123@my-mongo")


# Connect to MongoDB

client = MongoClient(MONGO_URL)

db = client.feedback_db

collection = db.feedback


# Serve static files (like HTML, CSS) from "static" folder

app.mount("/static", StaticFiles(directory="static"), name="static")


# Route to serve feedback form (HTML page)

@app.get("/")

def get_form():

    return FileResponse("static/feedback.html")


# Route to handle form submission and save feedback to MongoDB

@app.post("/feedback")

def create_feedback(feedback: Feedback):

    result = collection.insert_one(feedback.dict())

    return {"id": str(result.inserted_id), "message": "Feedback received!"}
app/models.py
from pydantic import BaseModel
class Feedback(BaseModel):
  name: str
  email: str
  message: str
feedback.html
<!DOCTYPE html>

<html lang="en">

<head>

<meta charset="UTF-8">

<title>Submit Feedback</title>

<style>

body { font-family: Arial; max-width: 600px; margin: 50px auto; }

input, textarea { width: 100%; padding: 10px; margin-bottom: 15px; }


button { padding: 10px 20px; cursor: pointer; }

</style>

</head>

<body>

<h2>Feedback Form</h2>

<form id="feedbackForm">

<input type="text" id="name" placeholder="Your name" required />

<input type="email" id="email" placeholder="Your email" required />

<textarea id="message" placeholder="Your feedback..." required></textarea>

<button type="submit">Submit</button>

</form>

<p id="responseMsg"></p>

<script>

const form = document.getElementById("feedbackForm");

const msg = document.getElementById("responseMsg");

form.addEventListener("submit", async (e) => {

e.preventDefault();

const data = {

name: document.getElementById("name").value,

email: document.getElementById("email").value,

message: document.getElementById("message").value,

};

try {

const res = await fetch("/feedback", {

method: "POST",

headers: { "Content-Type": "application/json" },

body: JSON.stringify(data),

});

const result = await res.json();

msg.textContent = result.message || "Feedback submitted!";

form.reset();

} catch (err) {

msg.textContent = "Failed to submit feedback.";

}

});

</script>

</body>

</html>
requirements.py
fastapi

uvicorn[standard]

pymongo
To create a Docker image, we need to create a Dockerfile. This file will contain the instructions for building the Docker image. Here we are extending our image from python-slim and registering in aws Ecr(Elastic Container Registry). If you are new to aws no need to worry, simply follow the steps in your aws command line interface.
- Prepare Dockerfile with all instructions as follows:
# Use an official Python runtime as a parent image

FROM python:3.10-slim

# Set the working directory in the container

WORKDIR /app

# Copy the current directory contents into the container at /app

COPY . /app

# Create and activate a virtual environment

RUN python -m venv /app/venv

# Install any needed packages specified in requirements.txt using the virtual environment

RUN /app/venv/bin/pip install --no-cache-dir -r requirements.txt

# Expose the port that the app runs on

EXPOSE 8000

# Run the application using the virtual environment

CMD ["/app/venv/bin/uvicorn", "app.main:app", "--host", "0.0.0.0", "--port", "8000"]
2. Now Build an image in our local using dockerfile by running,
docker build -t my-feedback-app:latest .
3. Now configure your aws account with access_keys.
Run aws configure in your terminal
You’ll be prompted to enter the following with your aws access_keys:
AWS Access Key ID [None]: XXXXXXXXXXXXXEXAMPLE
AWS Secret Access Key [None]:
XXXXXXX/XXXXXXXX/EXAMPLEKEY
Default region name [None]: us-east-1
Default output format [None]: json
4. create a ecr repository with,
aws ecr create-repository --repository-name my-feedback-app
5. then get a copy of image to push into aws ecr,
docker tag my-feedback-app:latest <account_id>.dkr.ecr.us-east-1.amazonaws.com/my-feedback-app:latest
6. Finally push the copied image to Elastic container registry repository
docker push <account_id>.dkr.ecr.us-east-1.amazonaws.com/my-feedback-app:latest
7. Open aws ecr repository and copy arn of your latest image and pull it to ur local like how we pull public images from docker hub.
docker pull <account_id>..dkr.ecr.us-east-1.amazonaws.com/my-feedback-app:latest
In this section, we learned how to create an image from a Dockerfile and push it to a private repository. Now, we'll move forward with developing applications using Docker containers. So far, we have been pulling and running Docker images individually. However, when managing multiple services, running containers one by one can become tedious. Don't worry — the good news is that we can simplify this process! With Docker Compose, we can launch all the containers together in a single command.
Orchestrating with Docker Compose
It is a tool that lets you define, configure, and run multi-container Docker applications using a YAML file. It's part of the Docker ecosystem and makes your workflow cleaner, more scalable, and easier to manage.
Our idea is to launch an application which runs on multiple containers that takes feedback from users. So we are using,
- FastAPI app to take feedback from user.(Private repository image)
- MongoDB for storing entered feedback.(public repository image)
- and finally with Mongo-Express GUI to verify feedback in database.(Public repository image)
Now will quickly integrate whole application with services like MongoDB, Mongo-Express and our FastAPI images within the same docker network using docker-compose. Involving docker volumes to persist the data even the containers die. Create a yaml file with all containers configuration as follows:
Config.yaml
version: '3.8'  # Specify Docker Compose version

services:

  # FastAPI app service

  my-feedback-app:

    image: <account_id>.dkr.ecr.us-east-1.amazonaws.com/my-feedback-app  # Image from ECR

    container_name: my-fastapi-app  # Set container name

    ports:

      - "8000:8000"  # Map host port 8000 to container port 8000

    networks:

      - my-network-my  # Attach to the custom network

  # MongoDB database service

  my-mongo:

    image: mongo  # Use official MongoDB image

    container_name: my-mongo  # Set container name

    ports:

      - "27018:27017"  # Expose MongoDB on port 27018 (host) -> 27017 (container)

    environment:

      - MONGO_INITDB_ROOT_USERNAME=admin  # MongoDB admin username

      - MONGO_INITDB_ROOT_PASSWORD=vijay_123  # MongoDB admin password

    networks:

      - my-network-my  # Attach to the same network

    volumes:

      - my-mongo-data:/data/db  # Persist MongoDB data

  # Mongo Express service (MongoDB web UI)

  my-mongo-express:

    image: mongo-express  # Use official mongo-express image

    container_name: my-mongo-express  # Set container name

    ports:

      - "8081:8081"  # Expose Mongo Express UI on port 8081

    environment:

      - ME_CONFIG_MONGODB_ADMINUSERNAME=admin  # Mongo Express admin user

      - ME_CONFIG_MONGODB_ADMINPASSWORD=vijay_123  # Mongo Express admin password

      - ME_CONFIG_MONGODB_SERVER=my-mongo  # Point to MongoDB service by name

    networks:

      - my-network-my  # Attach to the same network

# Define a custom bridge network so all services can communicate

networks:

  my-network-my:

    driver: bridge

# Define a named volume for persisting MongoDB data

volumes:

  my-mongo-data:
Note:- Replace your Aws Account Id in place of <account_id>
Now run docker-compose -f config.yaml up to initiate all containers which are configured in yaml file.
Ports where these containers are running on,
- FastAPI server on port : 8000
- MongoDB server on port : 27018
- MongoDB-Express on port : 8081
As we discussed earlier all containers within the same docker network can communicate with their names irrespective of their ports. We applied the same between our FastAPI and Mongo server with connection string rather than its port address.
Congratulations! Your application has been successfully containerized. You can now access it through the exposed ports and begin hands-on interaction with your first Docker deployment.
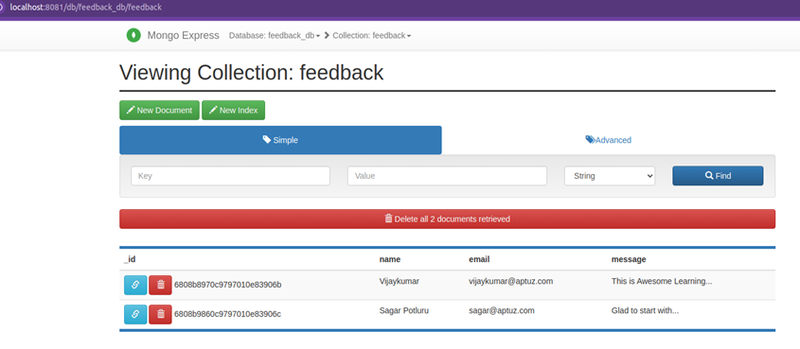
Feedback-app-ui on port : localhost:8000

After giving your feedback then click on submit and check your data is inserted into MongoDB by navigating to Mongo-Express on port 8081 and basicAuth credentials are "admin:pass", it is recommended you change this in your config.js!
Conclusion
We’ve gone from zero to a fully containerized, multi-service application — all powered by Docker.
You’ve learned how to:
- Understand Docker images, containers, networks, and volumes
- Build your own Docker image from a FastAPI Real-time project
- Push it to AWS ECR
- Use Docker Compose to manage multiple services seamlessly
Whether you’re building a side project or a scalable microservice architecture, Docker helps you ship faster, test easier, and collaborate better.
So go ahead, containerize your ideas, and take your development game to the next level!