In today’s fast-paced digital world, we need to provide real-time updates in our app. But how do we ensure our Angular app gets live data without a page refresh? Let’s dive into the world of Server-Sent Events (SSE) and WebSockets in Angular.
In this blog, we’ll explore how to use Server-Sent Events (SSE) for one-way updates and WebSockets (WS) for two-way communication in Angular.
Although Angular doesn’t have built-in support for SSE or WebSockets, its flexible architecture allows for seamless integration of both technologies, enabling real-time communication in your applications.
Server-Sent Event (SSE)
SSE is a way for the server to send real-time updates to our Angular app using one long-running HTTP connection. It uses the EventSource API to keep sending data from the server to the browser without needing repeated requests. It’s great for things like notifications, live stock prices, and real-time logs.
Key Features :
- Easy to Implement: Just use the EventSource API, or create a custom setup using fetch if we need more control—like adding headers or handling tokens within a service.
- Automatic Reconnection: The browser automatically tries to reconnect if the connection drops.
- Efficient Data Flow: SSE is great for sending real-time updates from server to client with less overhead than WebSockets, especially for one-way data flow.
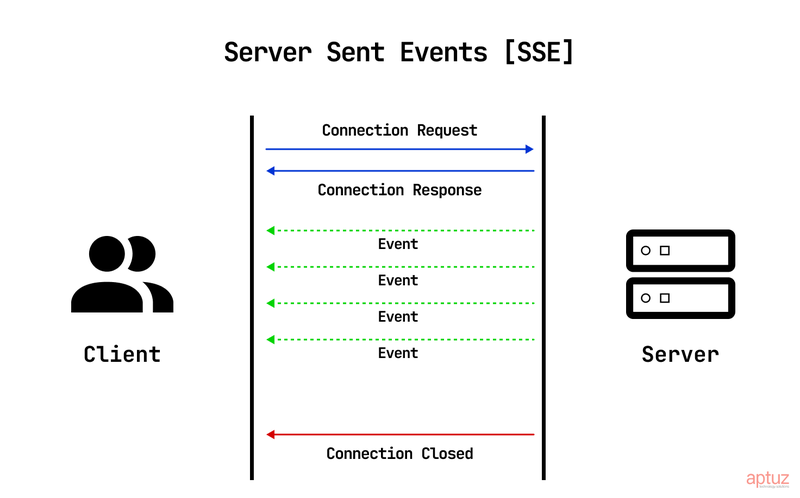
How SSE Works:
SSE works through Server and Client (Angular) HTTP connection:
- The server sets Content-Type: text/event-stream and holds the connection open
- In Angular, use the EventSource API to open a connection and get real-time updates.
- Since EventSource can't send custom headers (like tokens), we can pass tokens via query parameters in the URL or cookies for security.
- If we need custom headers, we can use fetch instead, but it’s more complicated.
- The server sends updates as small chunks of text, and Angular listens for them using EventSource.
- Make sure to close the connection when the user leaves the page or no longer needs the updates
Implementation of SSE in angular:
To implement SSE in Angular, we create a service that connects to the server using EventSource. Then, in the component, we inject the service and subscribe to the connectSSE() observable to receive real-time updates.
Here we are using SSE to get a chatbot-like response (a solution to a question). So place the SSE logic in a service and subscribed to it in the component.ts file.
sse-service.ts
private domain = 'https://our-backend-Api-url'; 		 // Our API domain
  connectSSE(path: string, payload: any): Observable<any> {
    const url = `${this.domain}${path}`;

    return new Observable((observer) => {      // If the backend supports SSE (Server-Sent Events), this will work
      const eventSourceUrl =      ${url}?tenant_id=${tenantId}&payload=${encodeURIComponent(JSON.stringify(payload))}`;

      // Initialize EventSource
      const eventSource = new EventSource(eventSourceUrl, {
        withCredentials: true // Include credentials like cookies (if needed)
      });

      // Listen for 'message' events (these are the chunks coming from the server)
      eventSource.onmessage = (event) => {
        try {
const data = JSON.parse(event.data);
          observer.next(data);

          // Check for a specific condition (like `chat_id` to close the stream)
          if (data.chat_id) {
            observer.complete();
            eventSource.close(); // Close the connection once the required data is received
  }
        } catch (error) {
          console.error('Error parsing SSE message:', error);
        }
      };

      // Handle any errors that occur with the EventSource
      eventSource.onerror = (error) => {
        observer.error(error);
        eventSource.close();
      };

      // Cleanup: Close the EventSource when the observable is unsubscribed
      return () => {
        eventSource.close();
      };
    });
  }          };

          readChunks();
        })
        .catch(err => observer.error(err));
    });
  }
component.ts:
In component.ts, we will receiving the response in chunks and manually concatenating the strings to build and display the chatbot's reply as a complete sentence in real time.
// Add a loading placeholder message from the chatbot and get its index
const chatbotIndex = this.messages.push({
      role: 'chatbot',
      content: '● ● ●',   // Placeholder to show typing indicator
    }) – 1;

// Start the SSE connection and listen for streamed responses
this.serviceInstance.connectSSE('/your-endpoint-path', params).subscribe((result) => {
    if (result.chunk) {
    // If the chatbot is still showing the typing indicator, replace it with the first chunk
      if (this.messages[chatbotIndex].content === '● ● ●') {
        this.messages[chatbotIndex].content = result.chunk + ' ';
      } else {
   // Otherwise, keep appending new chunks to build the full response
        this.messages[chatbotIndex].content += result.chunk;
      }
    }
  }, (error) => {
    console.error('SSE error:', error);
  });
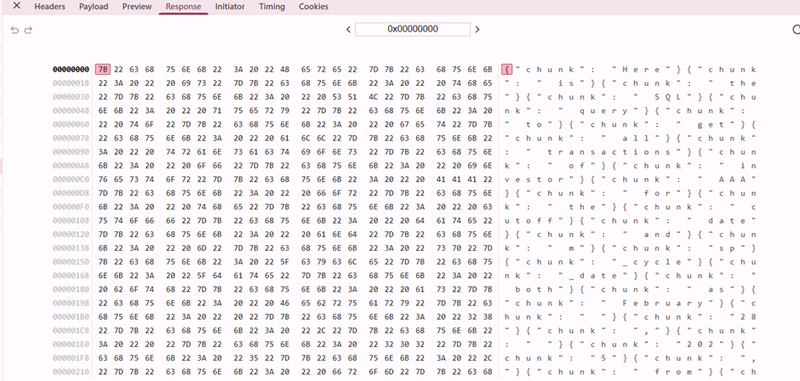
Example Output:
If we receive the following image in response, it means we have successfully established a connection with the server.
the output is received in small chunks. These chunks are combined in the component to display the full sentence like the one below will be streamed in parts:
" Here is the SQL query to get all transactions of investor …"
WebSocket:
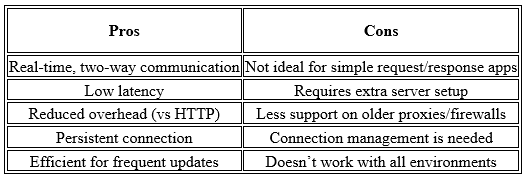
WebSocket is a communication protocol that enables real-time, two-way data exchange between a client and server over a single, persistent TCP connection. Unlike HTTP, it allows both sides to send messages any time after an initial handshake.
Ideal for use cases like chat apps, live updates, and gaming, WebSocket is supported in browsers via the JavaScript WebSocket API.
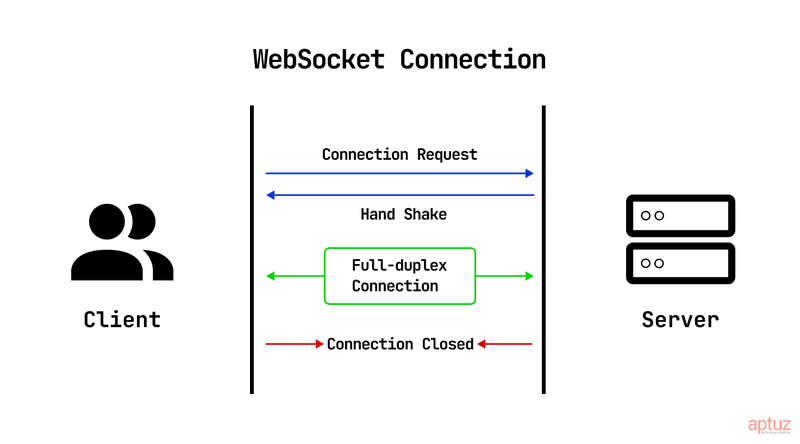
How WebSocket Works:
- Handshake: Client sends an HTTP request to upgrade the connection.
- Upgrade: Server accepts and switches to the WebSocket protocol.
- Open Connection: A persistent, full-duplex connection is established.
- Data Exchange: Both client and server can send messages anytime.
- Close: Either side can close the connection when done.
Implementation of WebSocket in angular:
To use WebSockets in Angular, we need to create a service that establishes and handles the WebSocket connection. We’ll then subscribe to the data from this service in our components to get real-time updates.
Let’s see how this works in action.
websocket.service.ts:
export class WebSocketService {

 private socket: WebSocket; // WebSocket object to manage the connection

private messageSubject = new Subject(); // Observable to send messages to components

private webSocketDomain = 'wss://your-websocket-server-url'; // Replace with your WebSocket server URL

// Method to establish a connection

setConnection(username: string, tenantId: string): void {

 this.socket = new WebSocket(${this.webSocketDomain}?user_name=${username}&tenant_id=${tenantId});

this.socket.onopen = () => {
  console.log('WebSocket connection established.');
};

this.socket.onmessage = (event) => {
  this.messageSubject.next(event.data);  // Emit received messages
};

this.socket.onerror = (error) => {
  console.error('WebSocket error:', error);
};

this.socket.onclose = () => {
  console.log('WebSocket connection closed.');
};
}

// Method to get WebSocket messages
getMessages() {
 return this.messageSubject.asObservable();
 }

// Method to close the WebSocket connection
closeConnection() {
this.socket.close();
   }
}
component.ts
Listen for real-time messages from the WebSocket server and log them
this.webSocketService.getMessages().subscribe((message) => {
console.log(message)
});
Example Output:
Once the WebSocket API call is successful and the connection is established, messages sent from the server will be received instantly and displayed in real time in the table below.

Conclusion:
Use SSE for simple, one-way real-time updates like notifications or live data.
Choose WebSocket when you need fast, two-way communication—like in chats or live collaboration.
Pick based on your app’s needs: SSE for simplicity, WebSocket for interactivity.
Give it a try and share your experiences in the comments below!
Reference Links:
SSE : https://medium.com/@andrewkoliaka/implementing-server-sent-events-in-angular-a5e40617cb78
Web Socket : https://medium.com/widle-studio/building-real-time-applications-with-websockets-in-angular-2a1c921b7baf